Most energy tools start in someone's hands long before they reach yours. Copper wands, triskelion coils, the SBB spirals tucked inside orgonite pyramids: somebody bent that wire, heated that joint, cleaned that connection. And if you've ever wanted to make your own, you need one foundational skill first.
Learning how to solder copper is simpler than most people expect. It takes patience, a few affordable tools, and a willingness to practice on scrap before you commit to a project. This guide walks you through everything you need to get started, from tools and materials to step-by-step technique, with an emphasis on safety and the kind of clean joints your future energy tools deserve.
Why Learn to Solder Copper?
Copper in Energy Healing: A Quick Background
Copper has held a special place in energy healing traditions for centuries. It's one of the most electrically conductive metals on earth, and practitioners believe that conductivity extends to subtle energy as well. In energy work, copper is used to direct, amplify, and focus energy through tools and structures.
Michelle Nast, the energy healer behind The Northern Daisy, works with copper daily. From the coils inside her handcrafted orgonite pyramids to the triskellions she builds by hand, copper is the backbone of many of her tools. Understanding how to work with it opens the door to creating your own.
What You Can Make
Once you can solder copper, a whole category of energy tools becomes accessible:
- Copper triskellions. Three spirals radiating from a center point, traditionally made from a single piece of 18-gauge wire cut to the "Earth resonance cubit" length (19.65 inches). Basic triskellions are simply bent with pliers, but more complex multi-wire designs require soldered connections.
- Copper healing wands. Copper tubing fitted with quartz crystal points at each end, filled with herbs, small crystals, or stones. Soldering secures the end caps and joins.
- SBB coils (St. Buster's Button). Flat copper spiral coils used inside orgonite pyramids. Larger coils require soldered joins between wire segments.
- Tensor rings. Copper wire twisted and formed into precise-length loops. Some designs need soldered connections to complete the circuit.
- Cloud buster components. The copper pipe assemblies used in cloud busters and other orgone-based tools often involve soldered joints.
Essential Soldering Tools and Materials
Your Starter Kit: What to Buy First
You don't need an expensive workshop. Here's what to gather before your first session:
- Soldering iron (60W or higher with adjustable temperature). For thin copper wire (18-gauge and smaller). Look for one with a fine tip for precision work.
- Propane torch. For thicker copper, tubing, and pipe. A basic handheld torch from any hardware store works well.
- Lead-free solder. This is non-negotiable. Lead-based solder poses serious health risks. Modern lead-free alternatives flow cleanly and create strong joints.
- Flux (rosin or paste). Flux prevents oxidation during heating and helps solder flow smoothly into the joint. Apply generously.
- Emery cloth or fine-grit sandpaper (220 grit). For cleaning copper surfaces before soldering. Clean copper is the single most important factor in a good joint.
- Wire cutters and needle-nose pliers. For cutting, bending, and positioning copper.
- Safety glasses. Solder can spit. Protect your eyes every time.
- Heat-resistant surface. A ceramic tile, firebrick, or silicone mat protects your workspace.
- Wet sponge or brass tip cleaner. For keeping your soldering iron tip clean between joints.
- Clamps or "helping hands" tool. Holds pieces in position while you work. Your hands will be busy with the iron and solder.
Where to Buy Soldering Supplies
Most of what you need is available at your local hardware store. Home Depot, Lowe's, and Harbor Freight carry torches, solder, flux, and copper materials. For specialized items like thin copper wire in specific gauges, check Amazon, jewelry supply shops, or craft stores. Copper tubing comes from the plumbing aisle. Quartz crystal points for wands are best sourced from Etsy, crystal shops, or wholesale mineral suppliers.
A complete starter kit runs between $40 and $80, depending on what you already own.
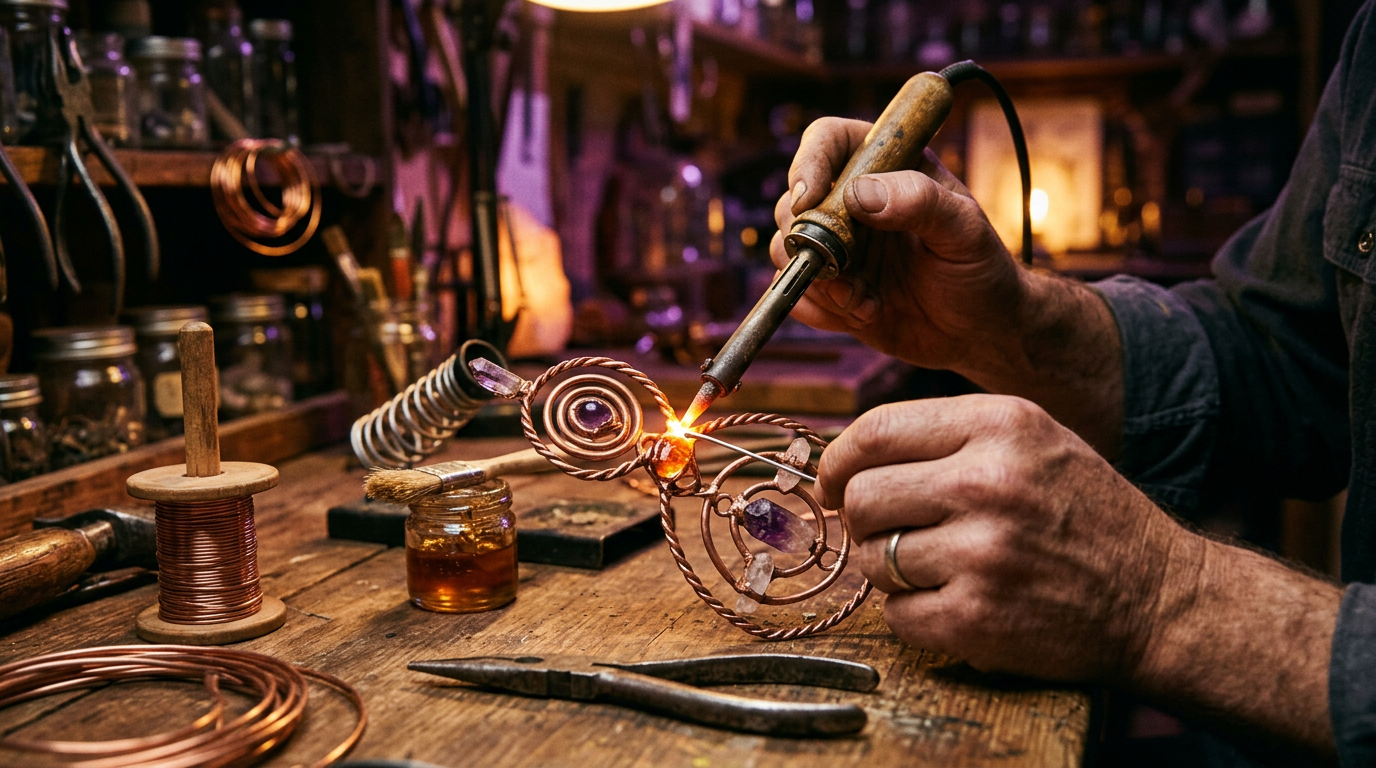
Copper Soldering Basics: Step by Step
Preparation: The Step That Makes or Breaks Your Joint
This is where most beginners either succeed or struggle. Clean copper solders beautifully. Dirty copper resists solder like water off a stone.
Sand both surfaces with emery cloth or fine sandpaper until the copper is bright and shiny. Even a thin layer of oxidation, invisible to the eye, will prevent solder from flowing properly. If you can see any dullness or discoloration, keep sanding.
Once cleaned, avoid touching the sanded areas with bare fingers. The oils from your skin can interfere with the bond.
Applying Flux
Coat both surfaces generously with flux. Flux does two important jobs: it prevents the copper from re-oxidizing during heating, and it encourages solder to flow into the joint through capillary action. Think of it as the welcome mat for your solder.
Use a small brush or the applicator that comes with paste flux. Cover every surface that solder needs to reach.
Heating and Flowing Solder
Here is the principle that separates good soldering from frustrating soldering: heat the copper, not the solder.
For a soldering iron: press the tip firmly against the copper joint. Wait. When the copper is hot enough (usually 5 to 15 seconds for thin wire, longer for thicker pieces), touch the solder wire to the joint, not to the iron. If the copper is at the right temperature, the solder will melt on contact and flow smoothly into the connection.
For a propane torch: apply the flame to the copper, moving it slowly around the joint to distribute heat evenly. Touch the solder to the opposite side from the flame. When it flows freely and gets drawn into the joint, you're there.
If the solder beads up instead of flowing, the copper isn't hot enough. If the flux burns away before the solder flows, you're applying too much heat too fast. Finding the right pace takes practice. Give yourself permission to waste a few inches of solder on scrap pieces first.
Cleaning Your Finished Joint
Let the joint cool completely without moving it. Disturbing the connection before the solder solidifies creates a "cold joint," a weak, grainy bond that will eventually fail.
Once cool, wipe away excess flux residue with a damp cloth. A good joint should look smooth and slightly shiny. A dull, rough, or lumpy joint usually means insufficient heat or contaminated surfaces.
Safety First: Working with Heat and Fumes
Soldering is a straightforward skill, but it involves real hazards. Take these seriously.
Ventilation and Fume Protection
Rosin-based flux produces fumes when heated that can irritate your eyes, throat, and lungs. With repeated exposure, these fumes can contribute to occupational asthma.
Minimum: Work near an open window with a fan pulling air away from your face.
Better: Use a benchtop fume extractor with a carbon filter. These are affordable ($25 to $50) and make a noticeable difference.
Best for extended sessions: A NIOSH-approved half-face respirator with organic vapor cartridges. This is especially important if you're soldering for more than 30 minutes at a time.
A basic dust mask is not sufficient. Flux fumes are chemical vapor, not particulate.
Burn Prevention
Soldering irons reach approximately 400°C (750°F). Propane torches are hotter still. A moment of inattention can mean a serious burn.
- Always use a proper iron stand. Never set a hot iron on your workbench.
- Use clamps or a "helping hands" tool to hold pieces. Your fingers should never be the third hand.
- Keep your workspace clear of flammable materials. A stray paper towel near a torch tip is a fire waiting to happen.
- Work on a heat-resistant surface and keep a fire extinguisher within reach.
Lead-Free Solder: Why It Matters
Older solder formulations contain lead, a toxic heavy metal that accumulates in the body over time. For energy tools that you'll handle regularly, place in your living space, or use near plants and water, lead-free solder is the only responsible choice.
If you're using older solder from a garage or inherited toolbox, check the label. Any solder containing lead requires extra precautions: thorough hand washing after every session, no eating or drinking in the work area, and separate storage away from living spaces.
Modern lead-free solder works well. It flows at a slightly higher temperature, but the techniques are identical.
Common Beginner Mistakes (and How to Avoid Them)
Skipping the cleaning step. It's tempting to jump straight to the iron. Resist. Ninety percent of failed joints trace back to dirty copper. Sand until it shines.
Moving the joint before it cools. Patience. A cold joint looks grainy, feels fragile, and will fail under stress. Set it down and walk away for a minute.
Heating the solder instead of the copper. When you touch solder to the iron tip directly, you get a blob sitting on top of the joint instead of flowing into it. Heat the copper. Let the copper melt the solder.
Using too little flux. Flux is cheap. Use more than you think you need. You can always clean the excess. You can't fix a joint that wouldn't flow because there wasn't enough flux.
Working in poor light. You need to see what you're doing clearly. A good desk lamp or headlamp makes the difference between a clean joint and a guessing game.
From Soldering to Energy Tools: Your Next Steps
Now you have the skill. The question is what to build first.
If you're drawn to orgonite, the SBB coil is a natural starting project, a flat copper spiral that goes inside every pyramid Michelle makes. If copper triskellions interest you, start with a simple single-wire design (no soldering needed) and work up to multi-wire versions. If larger projects call to you, explore cloud busters and other orgone-based tools that use copper pipe assemblies.
For a deeper understanding of why copper plays such a central role in energy work, including its connection to EMF protection and shielding and the sacred geometry behind energy tool design, explore the rest of our resource library.
Michelle built The Northern Daisy from this same workshop bench. Every orgonite pyramid in the shop carries copper worked by a healer's hands, not a factory's machines. Whether you're building your own tools or choosing one she's crafted, you're part of the same tradition: people who believe that what we make with intention carries something a shelf product never will.
Ready to explore handcrafted energy tools? Visit the Shop
Want to learn more about the maker behind The Northern Daisy?
